Auto-mount an external drive on boot[edit]
Step 1 – Plug In The Device[edit]
Step 2 – Identify The Device's Unique ID[edit]
In order to find the unique reference (UUID) for your drive run the following command in the terminal :
ls -l /dev/disk/by-uuid/
This will give you an output that should list your drive :
The line will usually refer to “/sda” and in this example it is “sda1”. My ID is “989B-E900”. Note down yours. You would need to repeat this step if you wanted to use a different device as the UUID would be different.
Step 3 – Create a Mount Point[edit]
A mount point is a directory that will point to the contents of your flash drive. Create a suitable folder :
sudo mkdir /media/usb
I’m using “usb” but you can give it whatever name you like. Keep it short as it saves typing later on. Now we need to make sure the Pi user owns this folder :
sudo chown -R pi:pi /media/usb
You will only need to do this step once.
Step 4 – Manually Mount The Drive[edit]
To manually mount the drive use the following command :
sudo mount /dev/sda1 /media/usb -o uid=pi,gid=pi
This will mount the drive so that the ordinary Pi user can write to it. Omitting the “-o uid=pi,gid=pi” would mean you could only write to it using “sudo”.
Now you can read, write and delete files using “/media/usb” as a destination or source without needing to use sudo.
Step 5 – Un-mounting The Drive[edit]
You don’t need to manually un-mount if you shutdown your Pi but if you need to remove the drive at any other time you should un-mount it first. Only the user that mounted the drive can un-mount it.
umount /media/usb
If you used the fstab file to auto-mount it you will need to use :
sudo umount /media/usb
If you are paying attention you will notice the command is “umount” NOT “unmount”!
Step 6 – Auto Mount[edit]
When you restart your Pi your mounts will be lost and you will need to repeat Step 4. If you want your USB drive to be mounted when the system starts you can edit the fstab file :
sudo nano /etc/fstab
Then add the following line at the end :
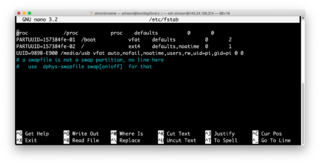
UUID=989B-E900 /media/usb vfat auto,nofail,noatime,users,rw,uid=pi,gid=pi 0 0
The “nofail” option allows the boot process to proceed if the drive is not plugged in. The “noatime” option stops the file access time being updated every time a file is read from the USB stick. This helps improve performance. This is what my fstab file looks like:
Make sure you set the correct UUID. Use CTRL-X followed by Y to save and exit the nano editor.
Now reboot :
sudo reboot
Your USB drive should be auto-mounted and available as “/media/usb”.
An Extra Note About File Systems[edit]
In the examples above I specified “vfat” as the file system of the device as it was formatted as FAT32. If you need to change the file system replace references of “vfat” with “ntfs-3g”, “ext3” or “ext4”. If you are using NTFS you will also need to install the following package :
sudo apt-get install ntfs-3g
Final Thoughts[edit]
This technique suits my applications but the main disadvantage is that it is specific to a known USB device given we are using the device ID. However if you created a few mount points in advance you could manually mount a new device to a spare mount point without worrying about updating the fstab file.


